
Help Center
 ›
Set and track service level targets

Set and track service level targets

Put a clock on every ticket, and see which ones are slipping
Set and track service level targets

Service levels put two clocks on every ticket — one for how long until somebody replies, one for how long until it's resolved — and show you at a glance which tickets are running late.

How it works

You set a target for each of your ticket priorities: how long an urgent ticket may wait for a first reply, how long a low one may take to resolve, and so on. From then on every new ticket carries two clocks, measured against the targets for its own priority.

The clocks count in your working hours, not around the clock, unless you tell them otherwise. A ticket that arrives at six in the evening starts counting the next morning, and nothing counts on a weekend or a holiday you've listed. So a four-hour target means four hours of your team's actual working time, not four hours of wall clock.

Wherever you look at tickets, a small colored pill tells you where each one stands: On Track, At Risk when three quarters of the target has gone, Breached once the deadline has passed, Paused while you're waiting on the customer, and Met when it's finished in time. A ticket shows the more urgent of its two clocks, so a fast first reply never hides a resolution about to run out.

None of this is on until you switch it on, and switching it on doesn't touch the tickets you already have.

Turn on service levels

  1. Select Configurations in the left sidebar, then Tickets.
  2. Open the SLA tab.
  3. Check Measure service levels on tickets.
  4. Leave Count working hours only checked if you want the clocks to run during your working week. Clear it to measure around the clock, including evenings and weekends.
  5. Select Save changes.
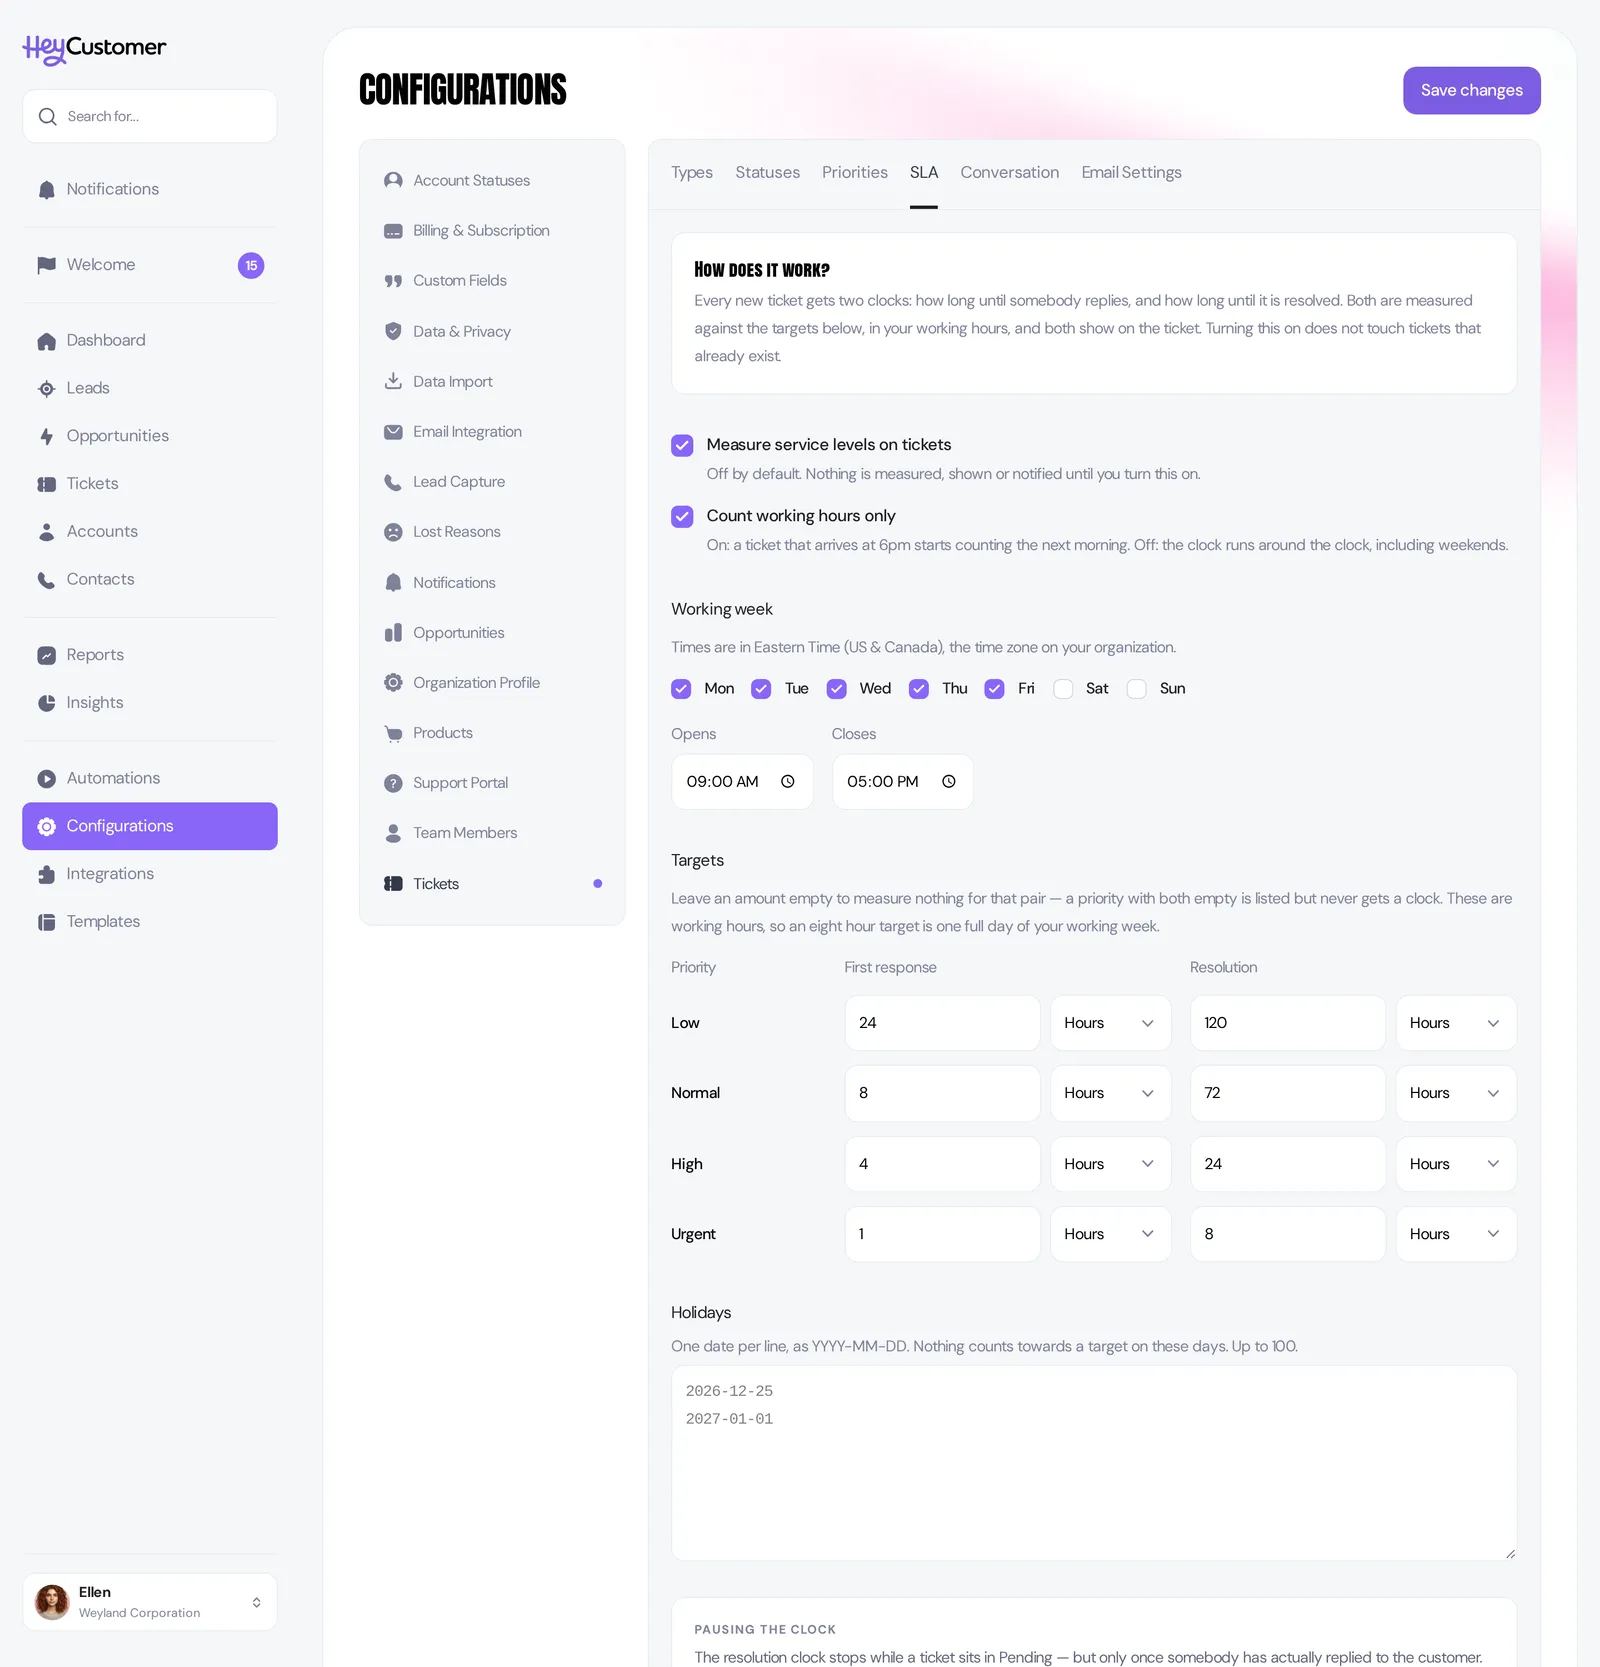
The SLA tab under Configurations and Tickets, with Measure service levels on tickets and Count working hours only both checked, a working week of Monday to Friday opening at 9:00 AM and closing at 5:00 PM, and target rows giving Low 24 and 120 hours, Normal 8 and 72, High 4 and 24, and Urgent 1 and 8.

Set your working week

This is what "working hours" means for your organization, and every target is measured against it.

  1. Under Working week, check the days you work.
  2. Set Opens and Closes. These hours apply to every day you checked, so a week of nine to five is two entries rather than fourteen.
  3. Under Holidays, list any dates nothing should count towards a target — one per line, written as YYYY-MM-DD, such as 2026-12-25.
  4. Select Save changes.

Times use the time zone set on your organization, which is shown above the day checkboxes. If you clear Count working hours only, the working week and the holidays stop mattering — the clocks simply run.

Set your targets

Each priority gets two targets: how long until a first response, and how long until the ticket is resolved. Enter an amount and choose minutes or hours.

  1. Under Targets, find the row for the priority you want to change.
  2. Enter an amount under First response and pick Minutes or Hours.
  3. Do the same under Resolution.
  4. Leave an amount empty for anything you don't want measured. A priority with both boxes empty is still listed, but its tickets never get a clock.
  5. Select Save changes.

You start with sensible targets already filled in, so you can switch service levels on and adjust later rather than filling in a grid first. Out of the box, urgent tickets get 1 hour to a first response and 8 hours to resolve; high, 4 hours and 24; normal, 8 hours and 72; low, 24 hours and 120. Those are working hours, so on a nine-to-five week an eight-hour target is one full working day.

Stop the clock while you wait on the customer

When you've answered and the ball is in the customer's court, you probably don't want the resolution clock ticking. You control that on the status itself, so any status you use for "waiting on them" can stop it.
  1. Go to Configurations, then Tickets, then the Statuses tab.
  2. Open the menu on an open status — Pending is the usual choice — and choose Edit.
  3. Check Pauses the SLA clock.
  4. Select Save.
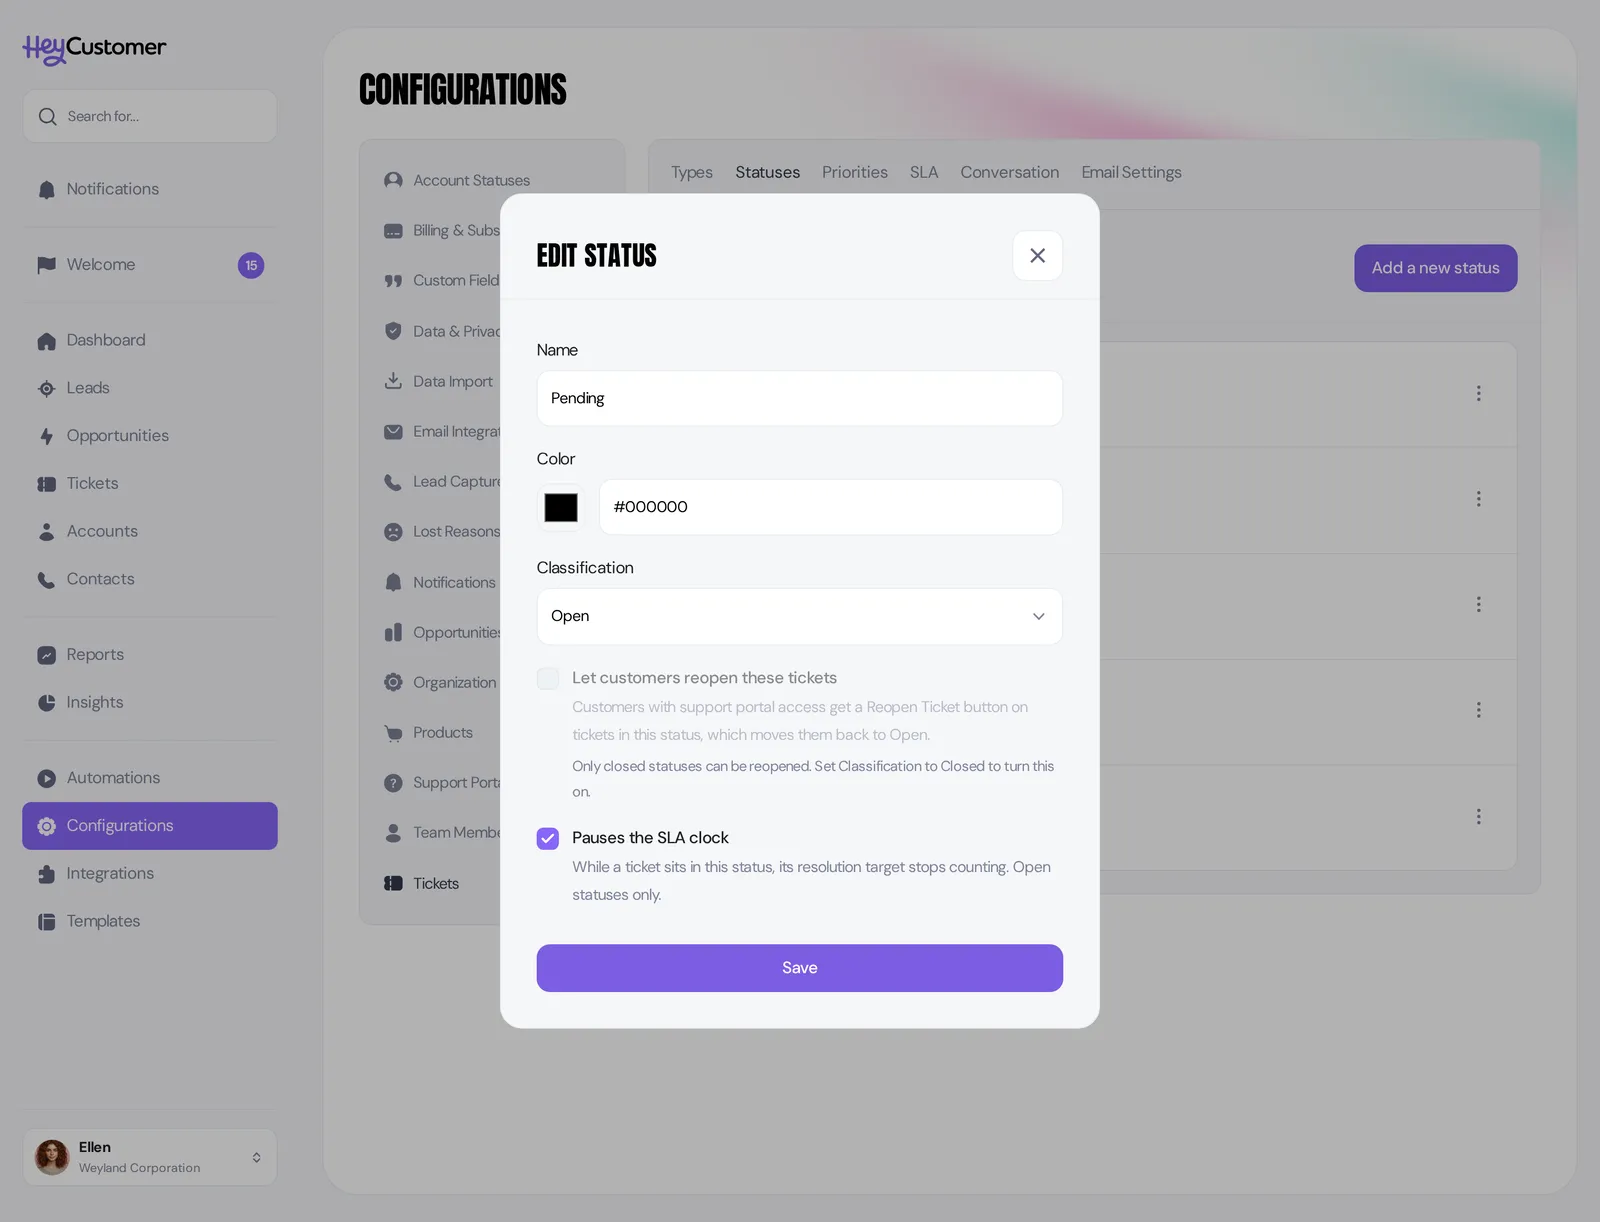
The Edit status panel for the Pending status, showing its name, color and Open classification, with Pauses the SLA clock checked and a note reading that while a ticket sits in this status its resolution target stops counting, open statuses only.

Two things are worth knowing about pausing. It only stops the resolution clock — a customer who hasn't come back to you doesn't excuse an unanswered ticket, so first response keeps counting. And it only takes effect once somebody has actually replied to the customer: moving an unanswered ticket into a pausing status won't stop its clock. The statuses list shows which of your open statuses pause and which keep counting, and the SLA tab names them back to you.

Measure the tickets you already have

Turning service levels on measures tickets opened from that moment. Everything already in your queue shows a dash in the SLA column instead, so a backlog can't breach the second you switch on.

When you're ready to include them:
  1. Scroll to The tickets you already had at the foot of the SLA tab.
  2. Select Start measuring — the button names how many tickets it will include.
  3. Confirm.
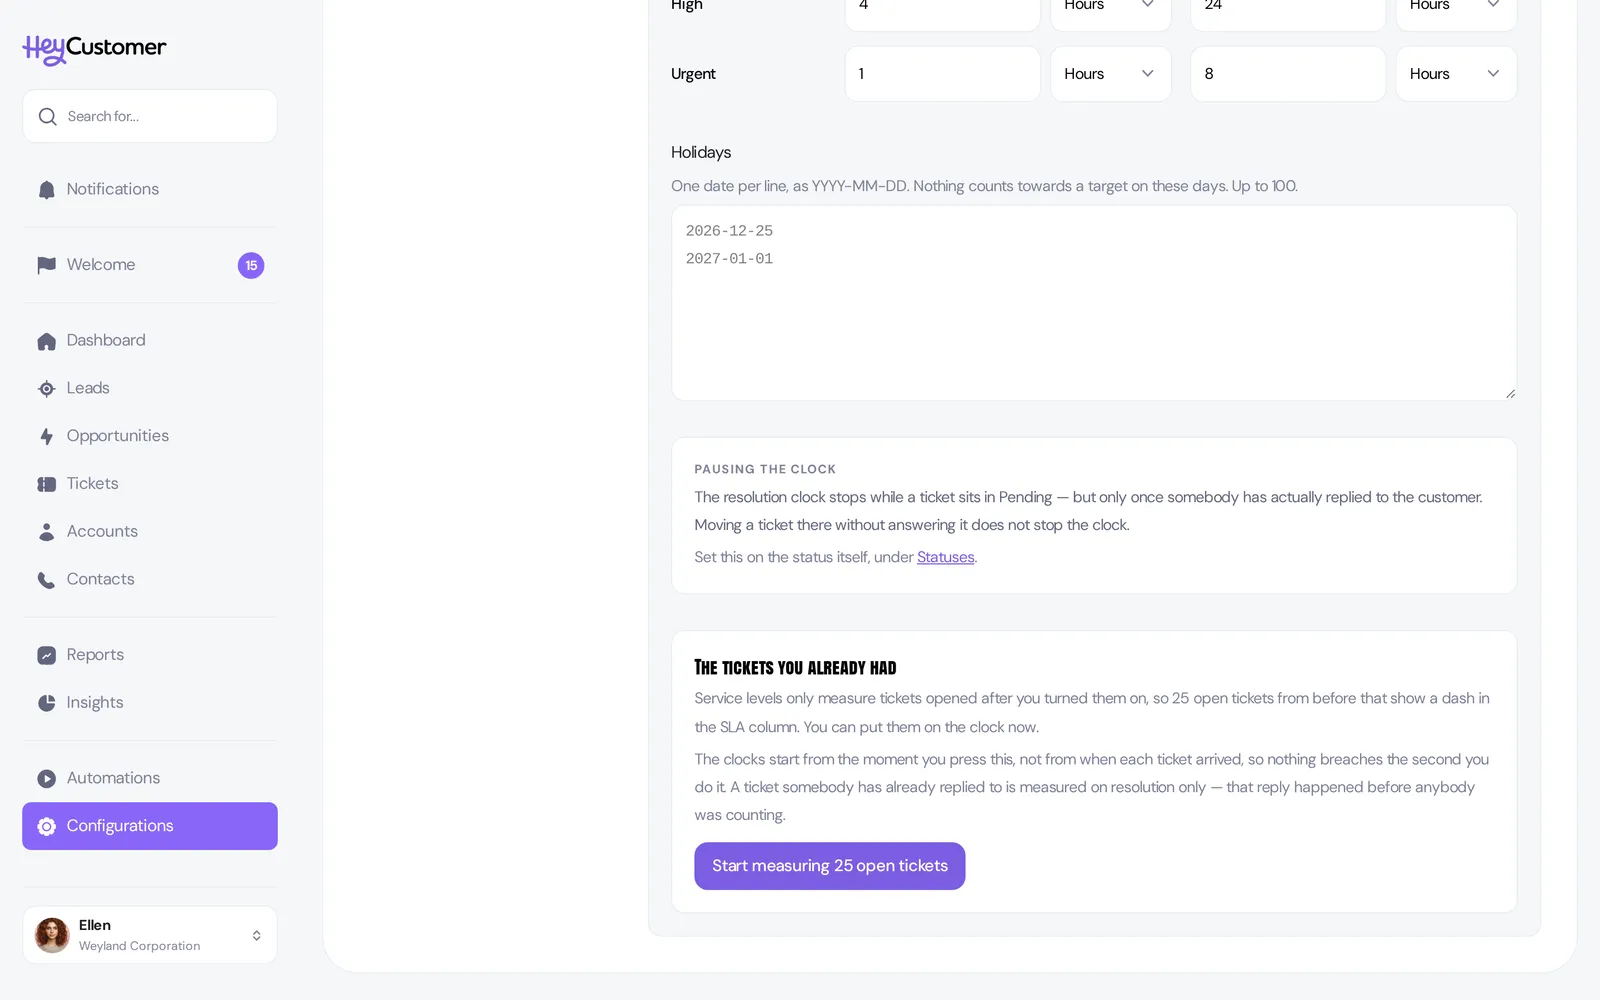
The foot of the SLA tab. A Pausing the clock panel explains that the resolution clock stops while a ticket sits in Pending but only once somebody has actually replied, and a panel titled The tickets you already had offers a Start measuring 25 open tickets button.

Their clocks start from the moment you press the button, not from when each ticket arrived, so nothing breaches immediately. A ticket you've already replied to is measured on resolution only — that reply happened before anyone was counting, and Hey Customer won't invent a first response time after the fact. The panel only appears when there's something to offer, and it's safe to leave alone if you'd rather only measure new work.

See where a ticket stands

Once service levels are on, the pill shows up in three places: as an SLA column in your ticket list, on each card on the board, and on the ticket itself.
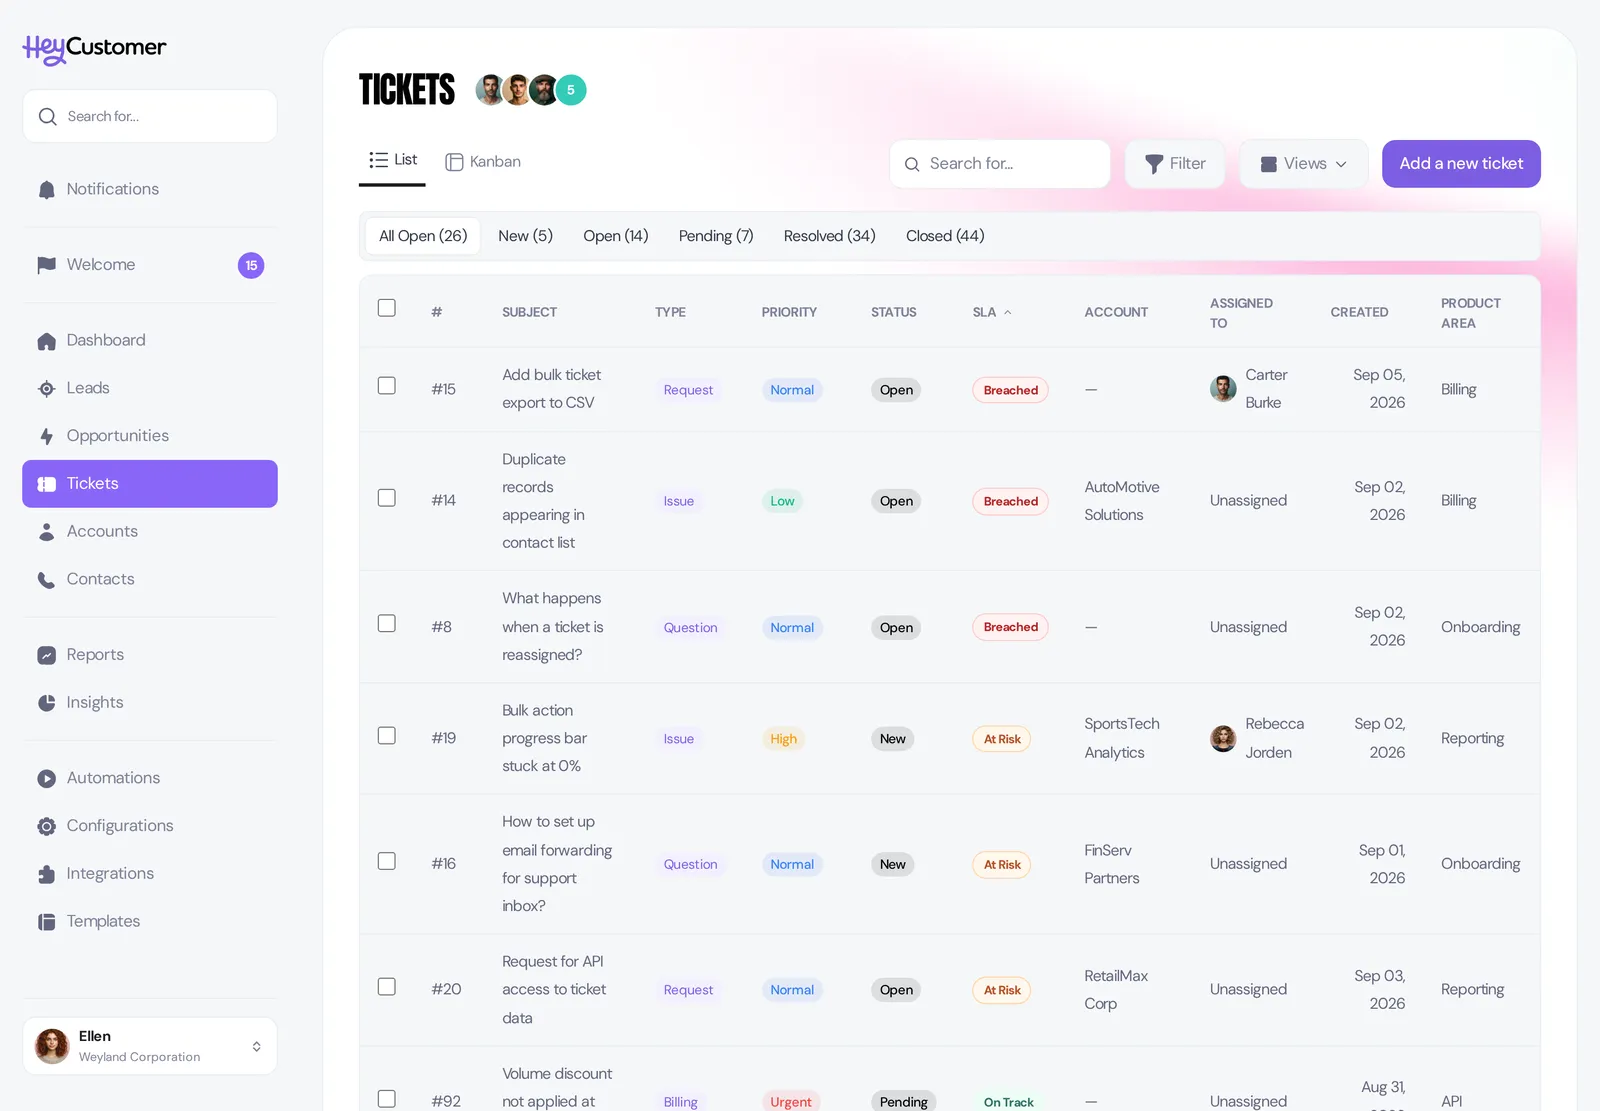
A ticket list sorted by the SLA column, showing three tickets marked Breached in red, three marked At Risk in amber and one marked On Track in green, each beside its type, priority, status and account.

On the ticket you get the detail as well as the word — for each clock, either how long it took and whether that met the target, or when it's due. Select the SLA column heading in the list view to sort by whichever deadline is coming up soonest.
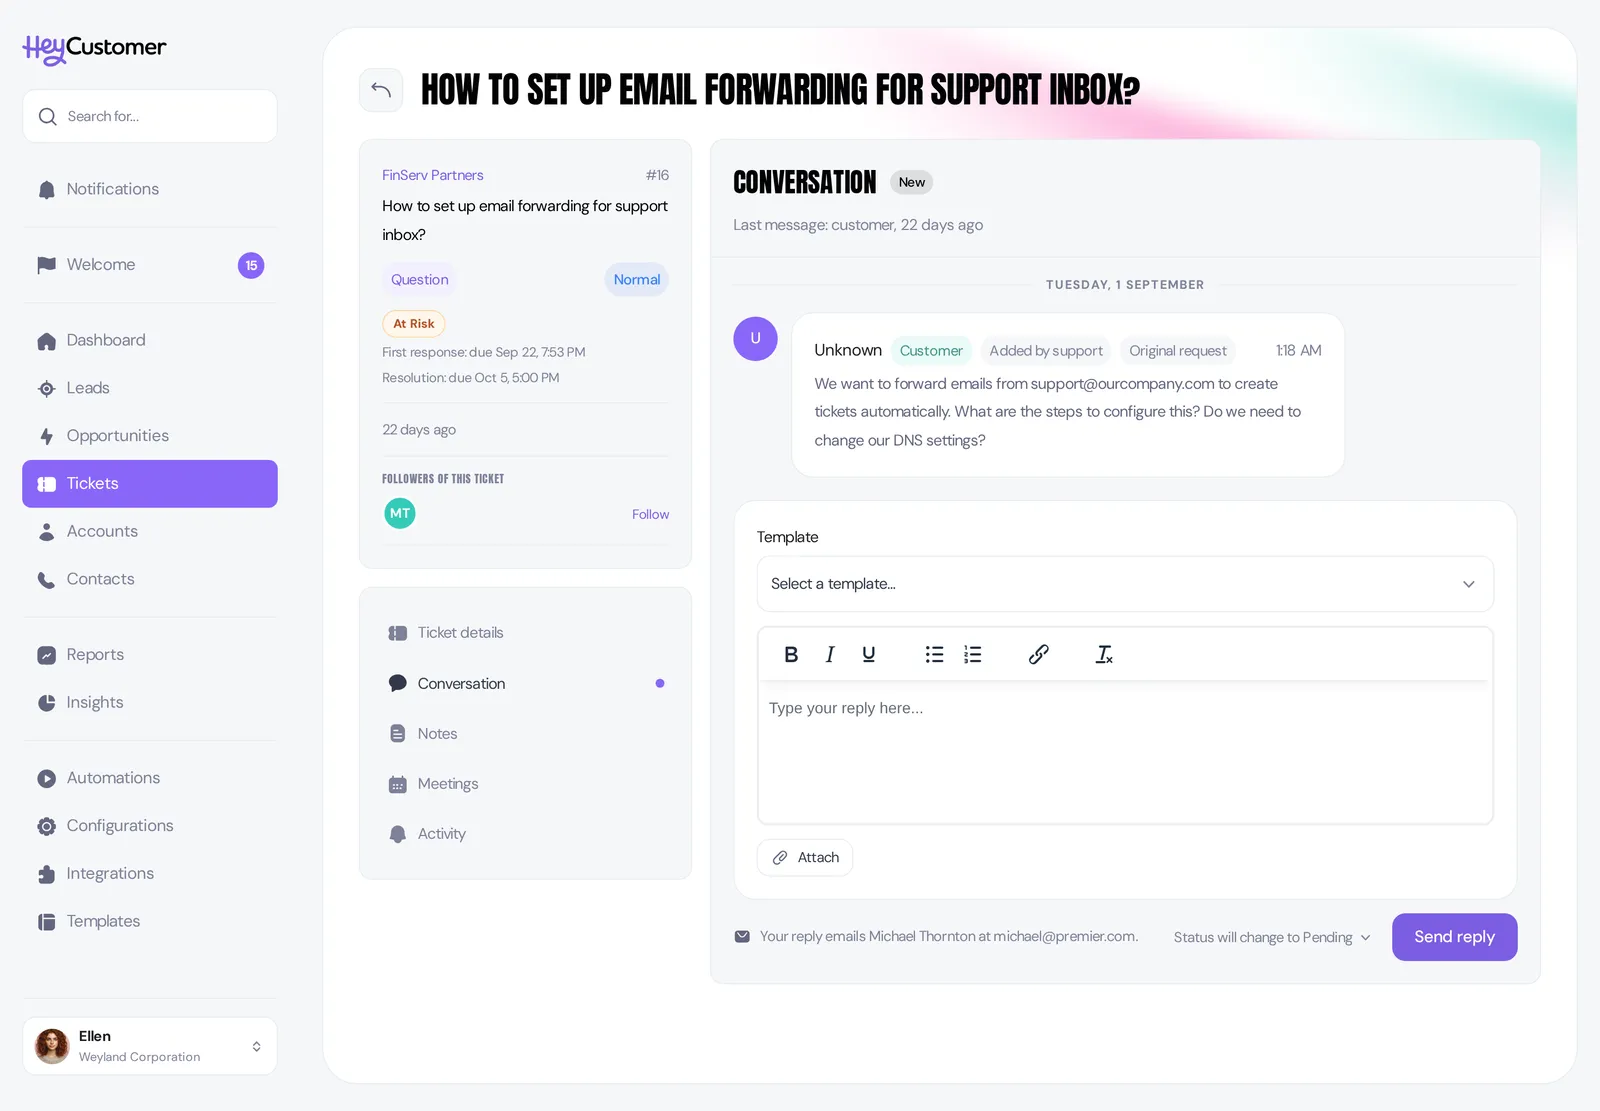
A ticket titled How to set up email forwarding for support inbox, showing an At Risk pill below its Question type and Normal priority, with two lines underneath reading First response: due Sep 22, 7:53 PM and Resolution: due Oct 5, 5:00 PM.

Find the tickets that are slipping

  1. Open Tickets.
  2. Select Filter, then SLA.
  3. Pick Breached, At Risk, Paused or Met.
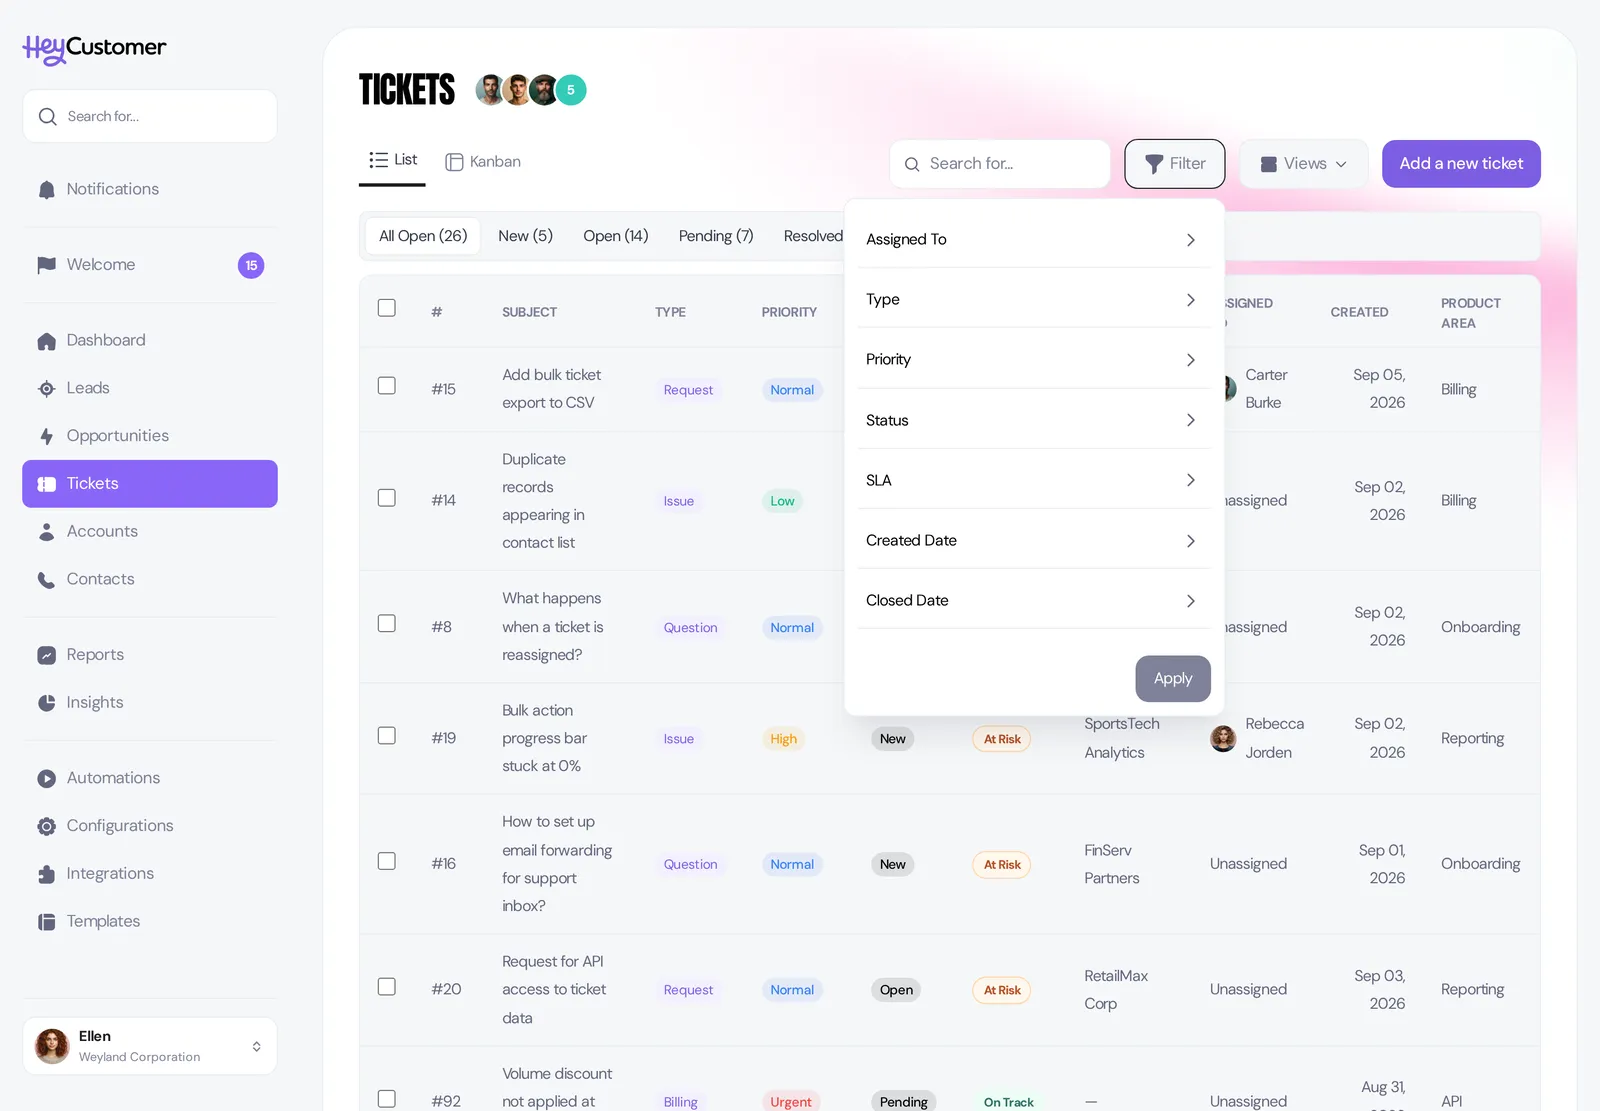
The Filter panel open over a ticket list, listing Assigned To, Type, Priority, Status, SLA, Created Date and Closed Date as categories, with an Apply button at the foot.

It's one choice rather than several, because the four states are exclusive — a ticket can't be both breached and met. The filter only appears for organizations that have turned service levels on.

Good to know

  • You need permission to reach Configurations. If Configurations isn't in your sidebar, ask an administrator to add configuration access to your group.
  • Nobody is emailed when a target is missed. The pill and the SLA filter are where late work shows up, so it's worth someone glancing at the breached filter as part of their day.
  • Service levels don't appear in reports yet. The clocks aren't available as report columns.
  • Targets are entered in minutes or hours. There's no "days" option, because a day's length depends on your working week and that would quietly change your targets whenever you edited your hours.
  • Times are written the way your week works. "2d 1h" on a nine-to-five week means two working days and an hour — about 17 working hours — not two calendar days.
  • Changing a ticket's priority re-aims the clocks that are still running. A clock that has already stopped keeps the target it was measured against, so figures you've already read don't move.
  • Reopening a resolved ticket starts a fresh resolution clock, measured against your targets as they stand today. The first response stays as it was — it happened, and reopening doesn't unhappen it.
  • A ticket logged as already resolved counts as resolved on the spot and never waits for a first response.
  • Tickets brought in through an import are never measured, so importing history can't fill your queue with breaches.
  • Holidays are capped at 100 dates.
  • A saved view can't filter on service levels. The state is worked out as the page loads rather than stored, and the underlying clock fields aren't offered as filter fields yet.
  • Turning service levels off stops new tickets being measured and takes the SLA column and the SLA filter off your ticket list. Tickets that already carry a clock keep showing their pill on the board and on the ticket itself. Your targets and working week stay as you left them, ready for when you turn it back on.

Still need help? Email us at support@heycustomer.com

Related articles

SLA, service level, service level agreement, SLA targets, first response time, resolution time, response target, breached SLA, at risk ticket, pause SLA clock, working hours, business hours, ticket deadline, SLA column, measure response times