
Help Center
 ›
Send a document for signature

Send a document for signature

From uploaded PDF to countersigned copy, without leaving the record
Send a document for signature

Hey Customer can send a PDF out for electronic signature and keep the whole exchange attached to the account or opportunity it belongs to. You mark up the places each person has to sign, type or fill in, email it to them, and watch it come back countersigned — without the document ever leaving the record.

How it works

Every document lives on either an account or an opportunity. Open one, choose Documents in the list down the left, and you'll see everything filed there, newest work first. Each document expands to show its details, its public sharing link and its signing status.

Which record you attach it to is a filing decision, not a functional one — signing behaves identically either way. Put an order form on the opportunity you're trying to close; put the signed master agreement on the account, where it stays useful long after that deal is done.

Electronic signing works on PDFs you upload. Documents you build from a template can be edited in Hey Customer and published as a public link, but they can't be sent for signature — if a document has to be signed, upload it as a PDF.
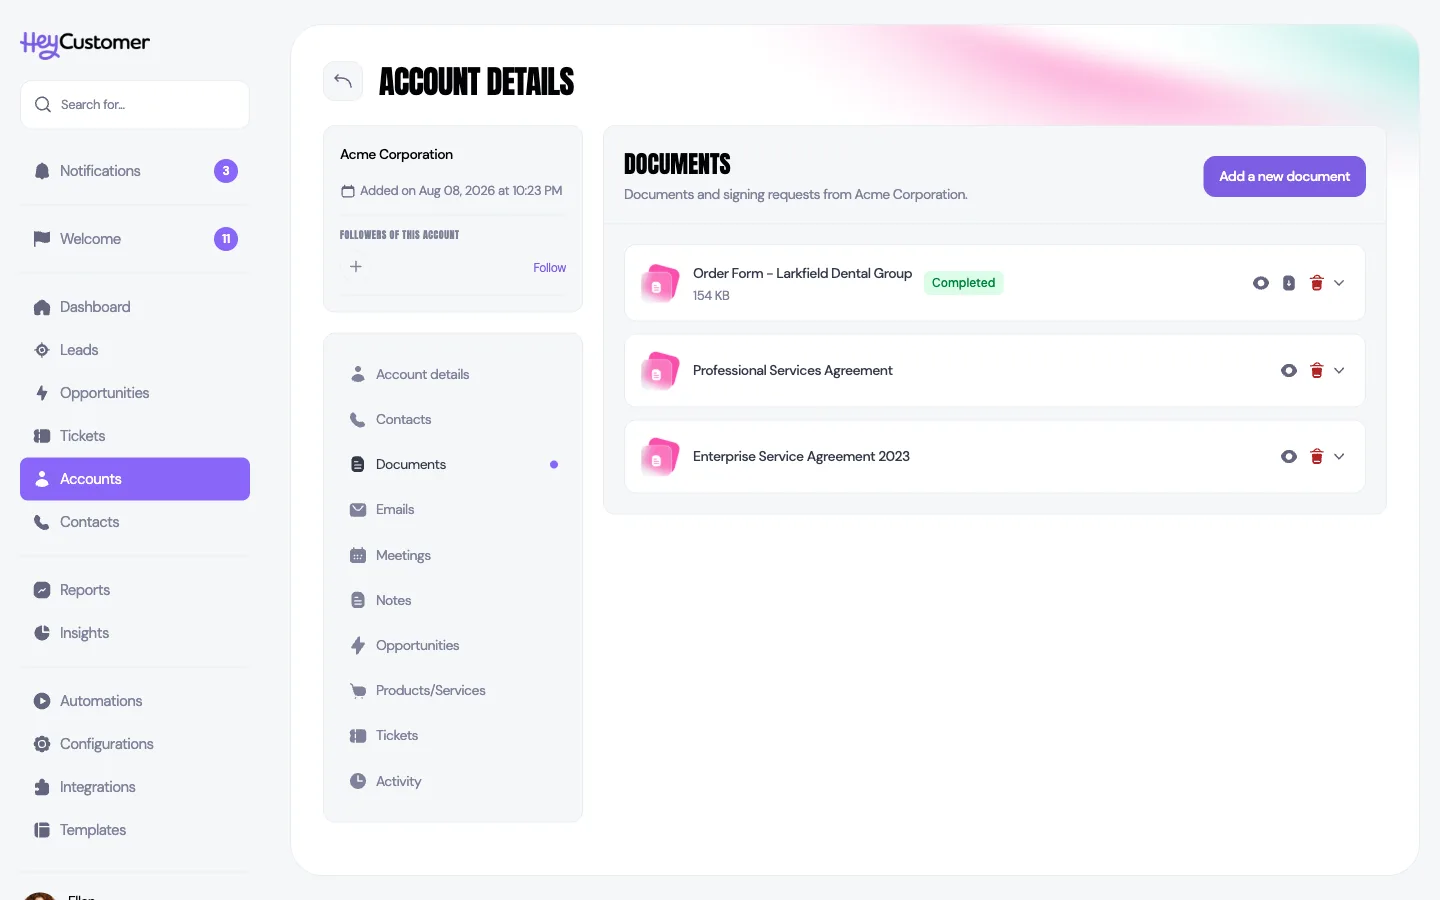
The Documents section of an account, listing three documents. The first, an order form, carries a green Completed badge and shows its file size, with icons to view, download and archive it.

Add the document

  1. Open the account or opportunity and select Documents.
  2. Select Add a new document, then Upload a document.
  3. Drop your PDF onto the box or select it from your computer. PDFs only, up to 10 MB.
  4. Give the document a name. Start and end dates are optional — use them if the agreement runs for a fixed term.
  5. Select Upload document.

Add the fields people fill in

Before you can send anything, you have to say where each person signs. Expand the document, find the Signing panel and select Prepare for signature. That opens the document full screen with a field palette beside it.

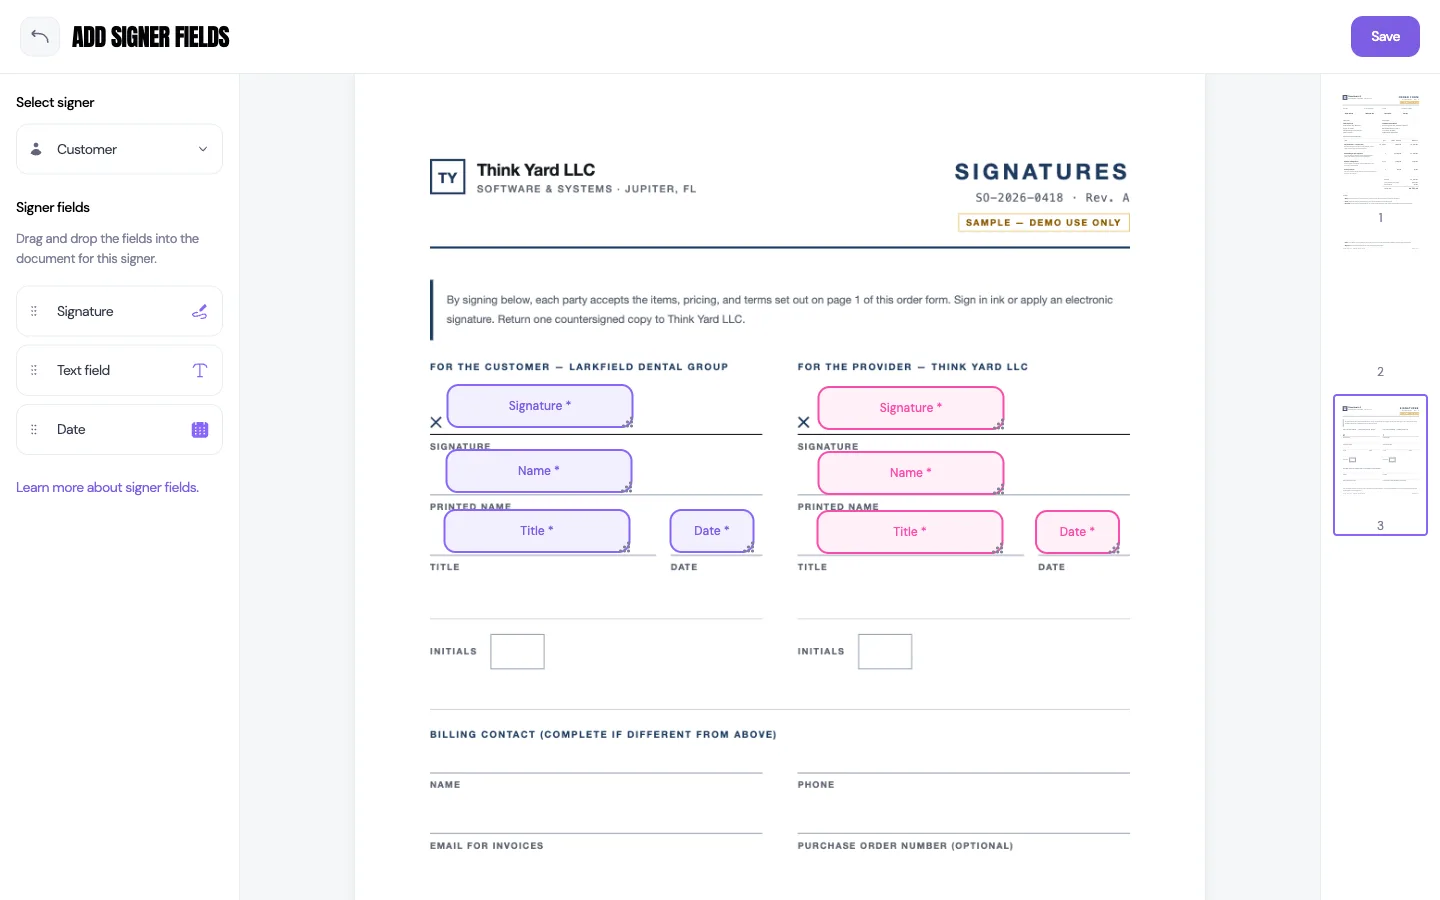
Pick who you're placing fields for in Select signerCustomer or Executive — then drag fields from the palette onto the page. Each signer's fields are color-coded so you can see at a glance who owns what. Page thumbnails on the right jump you between pages.

There are three kinds of field:

  • Signature — where that person signs. Every signer needs at least one.
  • Text field — anything they type, like a printed name, a title or a purchase order number.
  • Date — either stamped automatically at the moment they sign, or left for them to pick.
The Add signer fields screen. A signature page of an order form fills the middle, with signature, name, title and date fields dropped onto the customer block in purple and the provider block in pink. A palette of Signature, Text field and Date sits on the left under a Select signer dropdown.

Double-click any placed field to change it. You can rename it, reassign it to the other signer, and turn Required field off if it's optional — it's on by default, and a required field has to be filled before that person can finish signing. Date fields add one more switch: leave Auto-insert signing date on and Hey Customer fills the date for them, or turn it off to let them choose one.
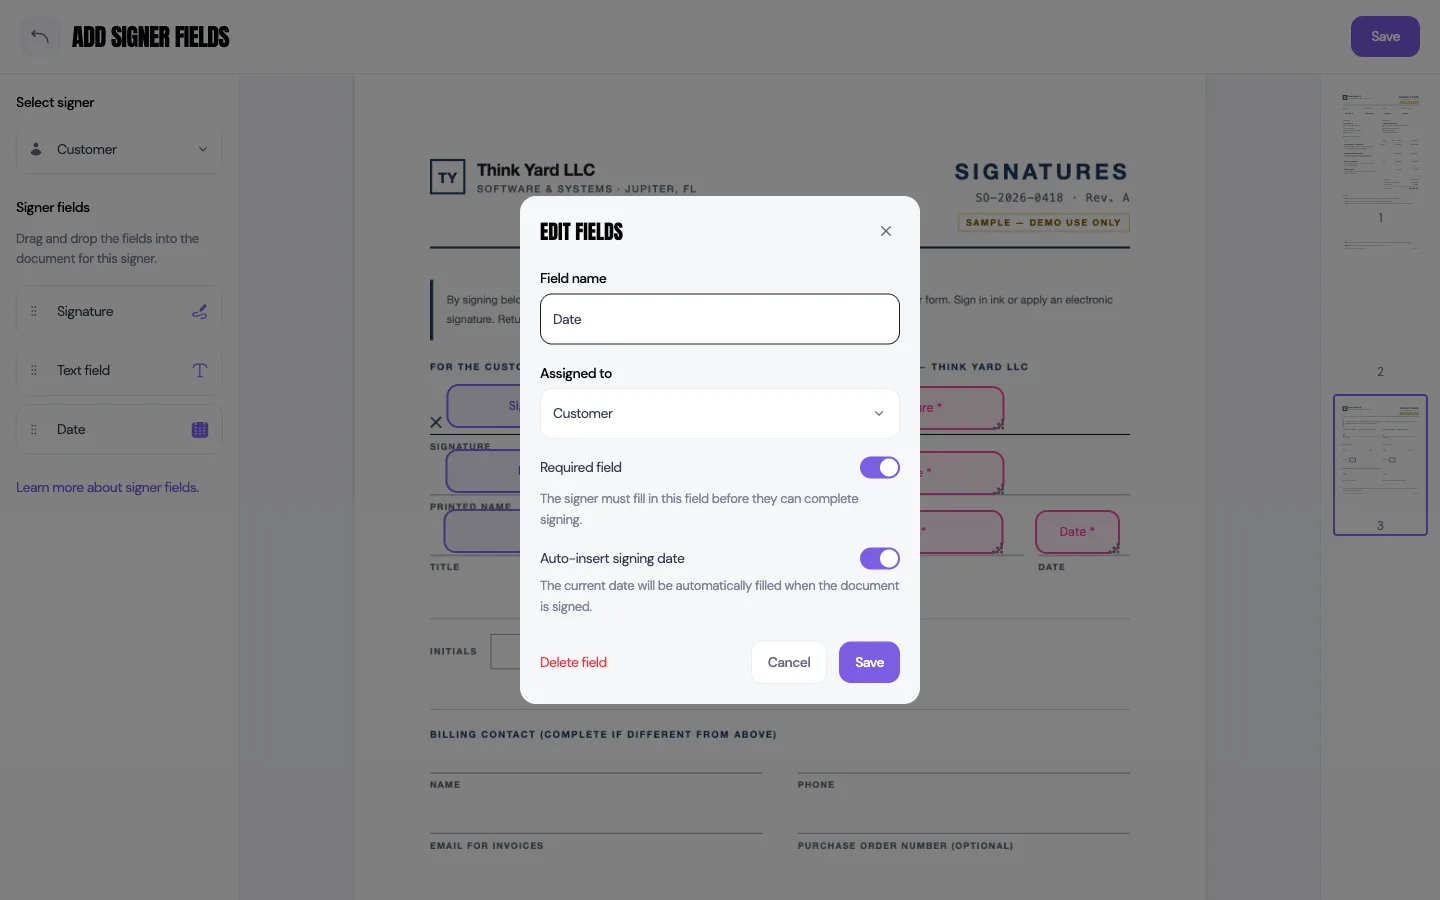
The Edit fields dialog for a date field, showing a Field name box, an Assigned to dropdown set to Customer, a Required field toggle turned on, and an Auto-insert signing date toggle turned on.

Select Save when the layout is right. You can come back and change it later with Edit fields, right up until you send.
Send it by email

  1. Back in the Signing panel, select Add signers.
  2. Check the Request name — it's what your signers see in the subject line and in the email itself.
  3. Set the Expiration date. It defaults to 30 days out, and it's the date the signing links stop working.
  4. Fill in a name and email for each signer. You get one row per signature role you laid out, numbered in signing order. Start typing and Hey Customer suggests contacts from the account and people on your team, but you can type any email address.
  5. Drag a row by its handle if you want someone to sign first instead.
  6. Select Send for Signature.
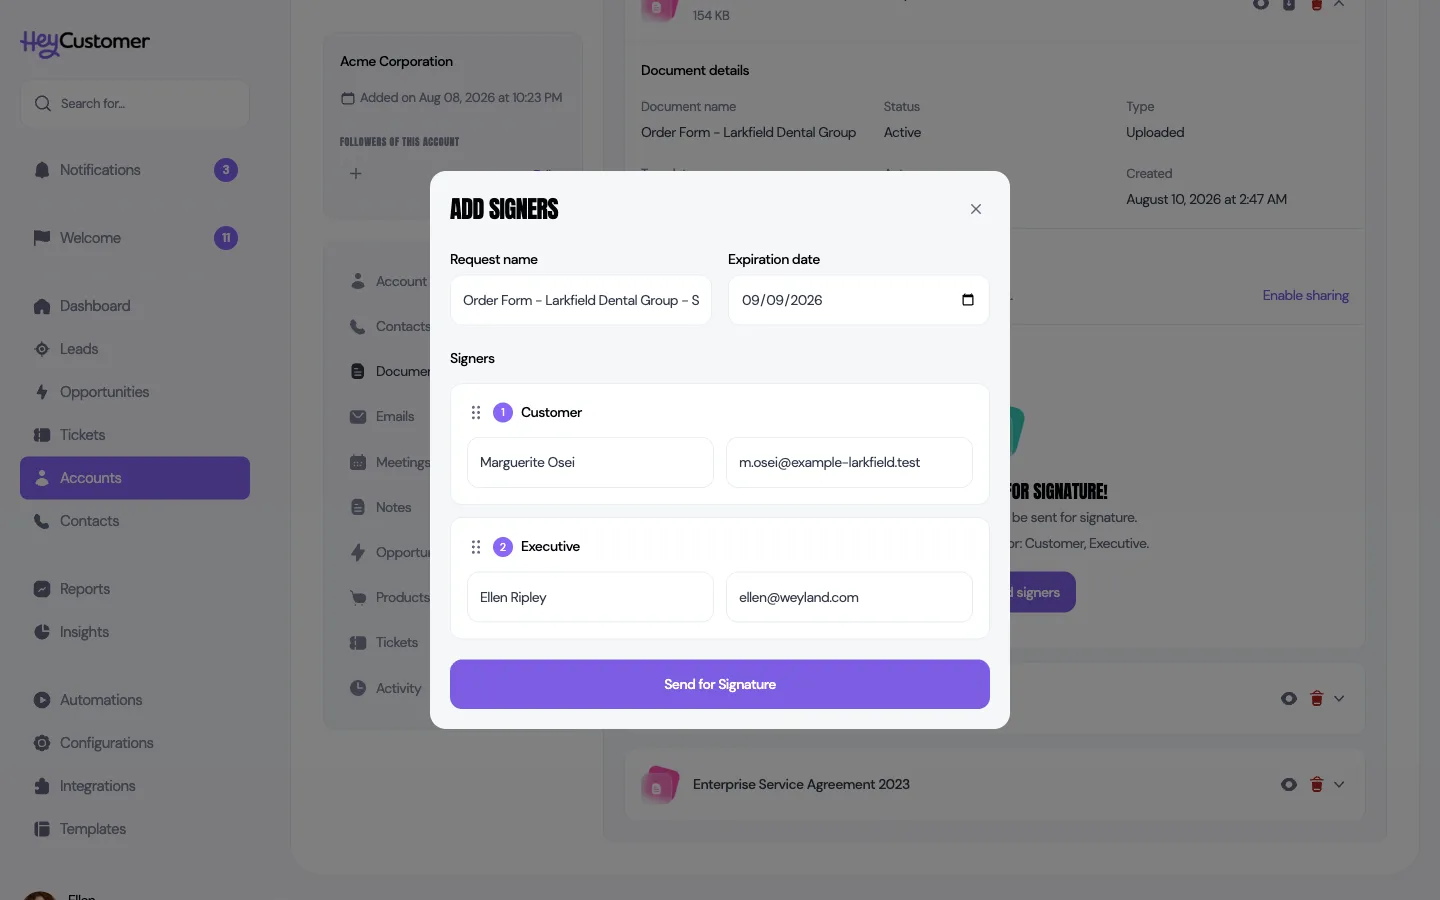
The Add signers dialog with a request name and an expiration date at the top, then two numbered signer rows, Customer and Executive, each with a full name and email address filled in, above a Send for Signature button.

People sign one after another, not all at once. Only the first signer is emailed straight away; the next person is invited automatically the moment the one before them finishes. The invitation comes from your organization's name, says who requested it, notes the date the request is valid until, and carries a Review & Sign Document button with a private link for that one person.
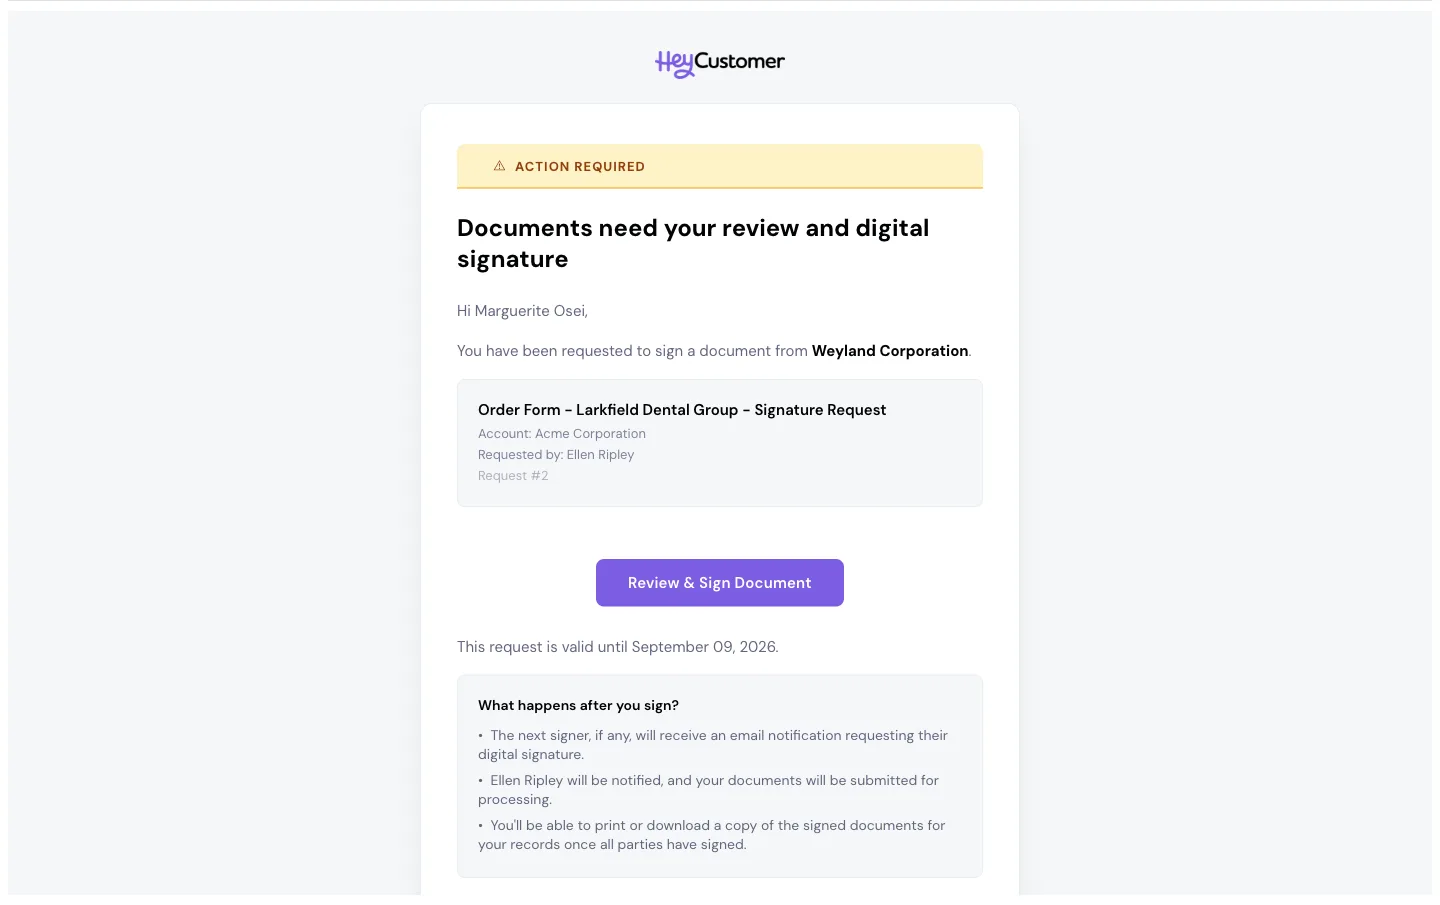
The signing invitation email. An Action required banner sits above the heading Documents need your review and digital signature, a card naming the document, account and requester, a Review and Sign Document button, the date the request is valid until, and a short list of what happens after signing.

What your signer sees

Signers don't need a Hey Customer account or a password — the link is enough. It opens the document with only their fields highlighted, a running count of how many they've completed, and a panel that walks them through one field at a time.

For a signature they can draw with a mouse or finger, or type their name and have it set in a signature script. Before they can finish they have to check the box agreeing to sign electronically, then select Complete Signing. They can also download a copy of the document to read first, or Decline and give a reason.
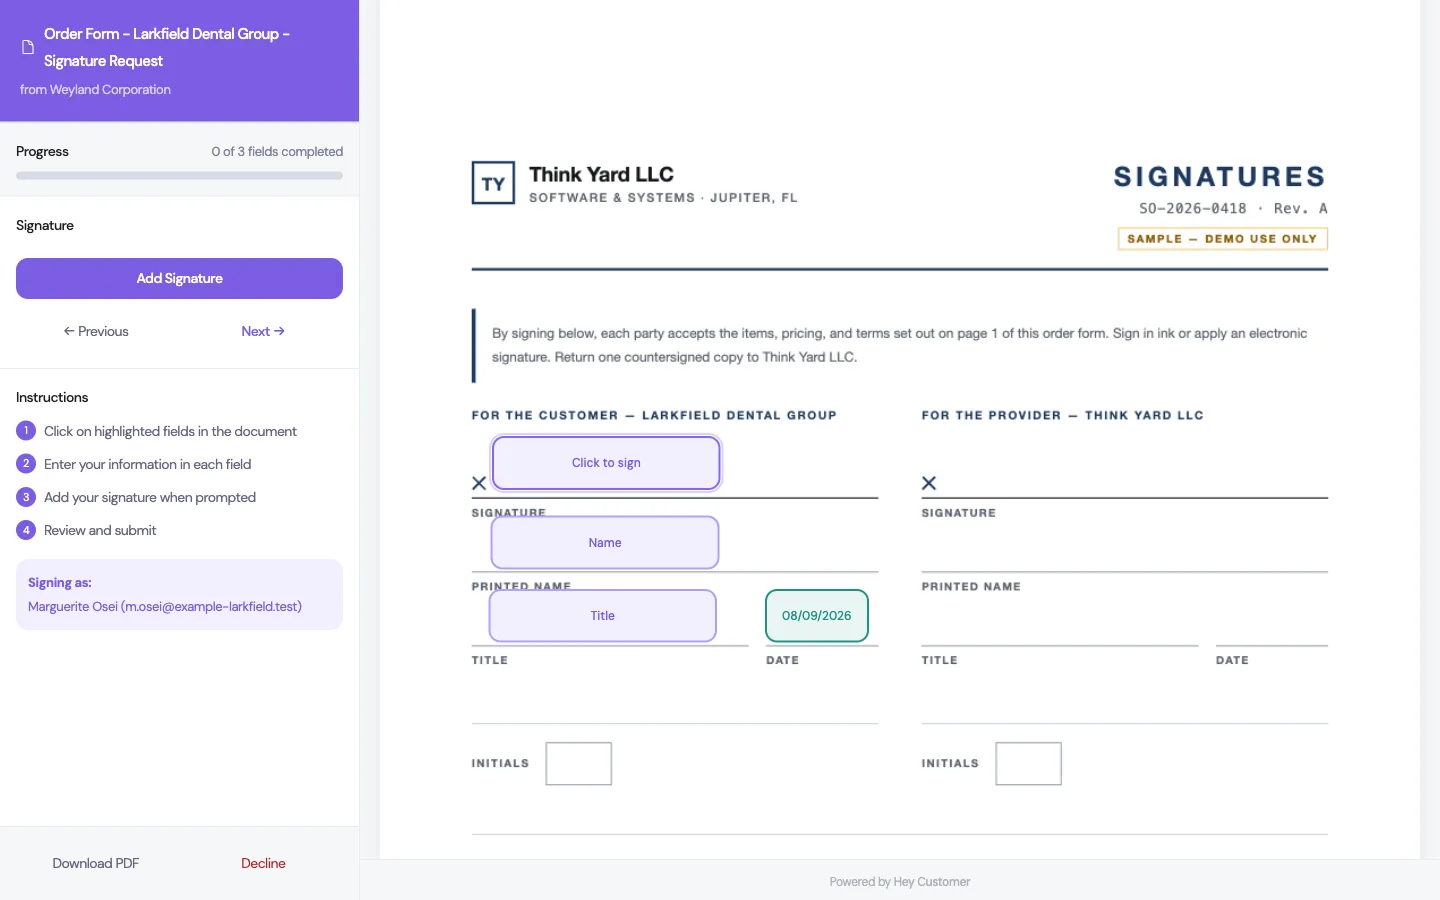
The signing page a recipient sees. A sidebar shows the document name, a progress bar reading zero of three fields completed, four numbered instructions and who they are signing as. The document beside it highlights a Click to sign box, a name box and a title box, with the date already filled in.

Follow it while it's out

The Signing panel turns into a tracker as soon as the request goes out. It shows when you sent it and when it expires, and lists every signer with their current state: Pending while it isn't their turn yet, Ready To Sign once they've been emailed, Viewed after they open the document, then Signed or Declined. The small counter next to each name is how many times that person has opened the document.
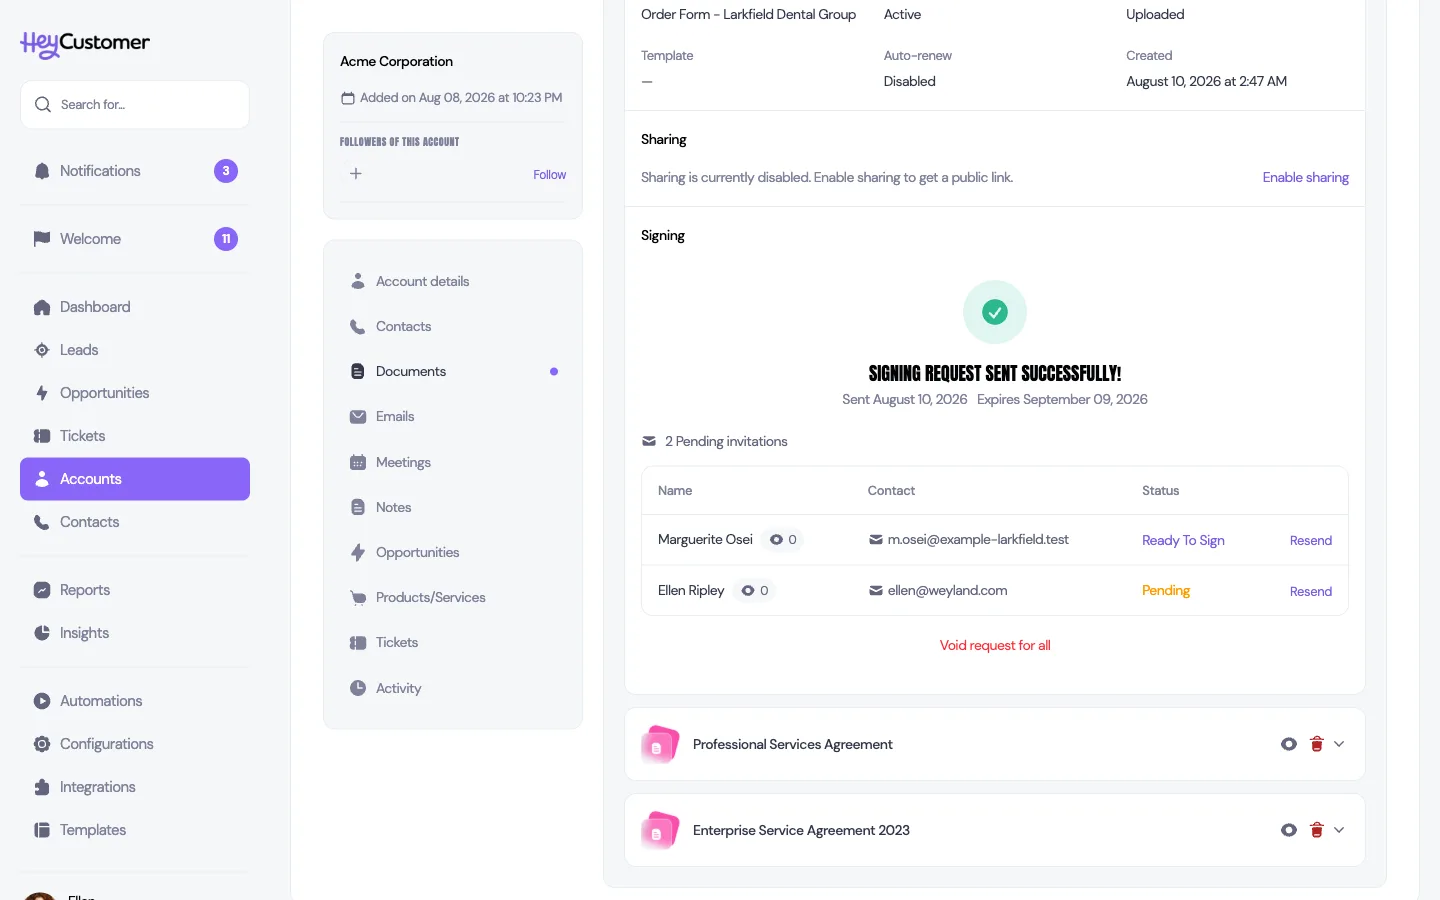
The signing panel after sending, headed Signing request sent successfully with the sent and expiry dates. A table lists two signers with their email addresses and statuses, Ready To Sign and Pending, each with a Resend link, above a red Void request for all link.

Nothing is chased automatically, so if someone goes quiet, select Resend next to their name. That issues them a fresh link and emails it again.

To call the whole thing off, select Void request for all. Every signer still waiting is emailed to say the request has been canceled, and their links stop working immediately. Two things void a pending request on your behalf: editing the document's contents, and archiving it.

If someone declines, you're emailed with the reason they gave. Signing doesn't roll on to the next person — sort out whatever the objection was, void the request, and send a fresh one.

If it expires before everyone signs

Once the expiration date passes, the links stop working and the panel shows Signing request expired. You don't have to start over. Select Extend & resend, pick a new expiration date, and confirm.
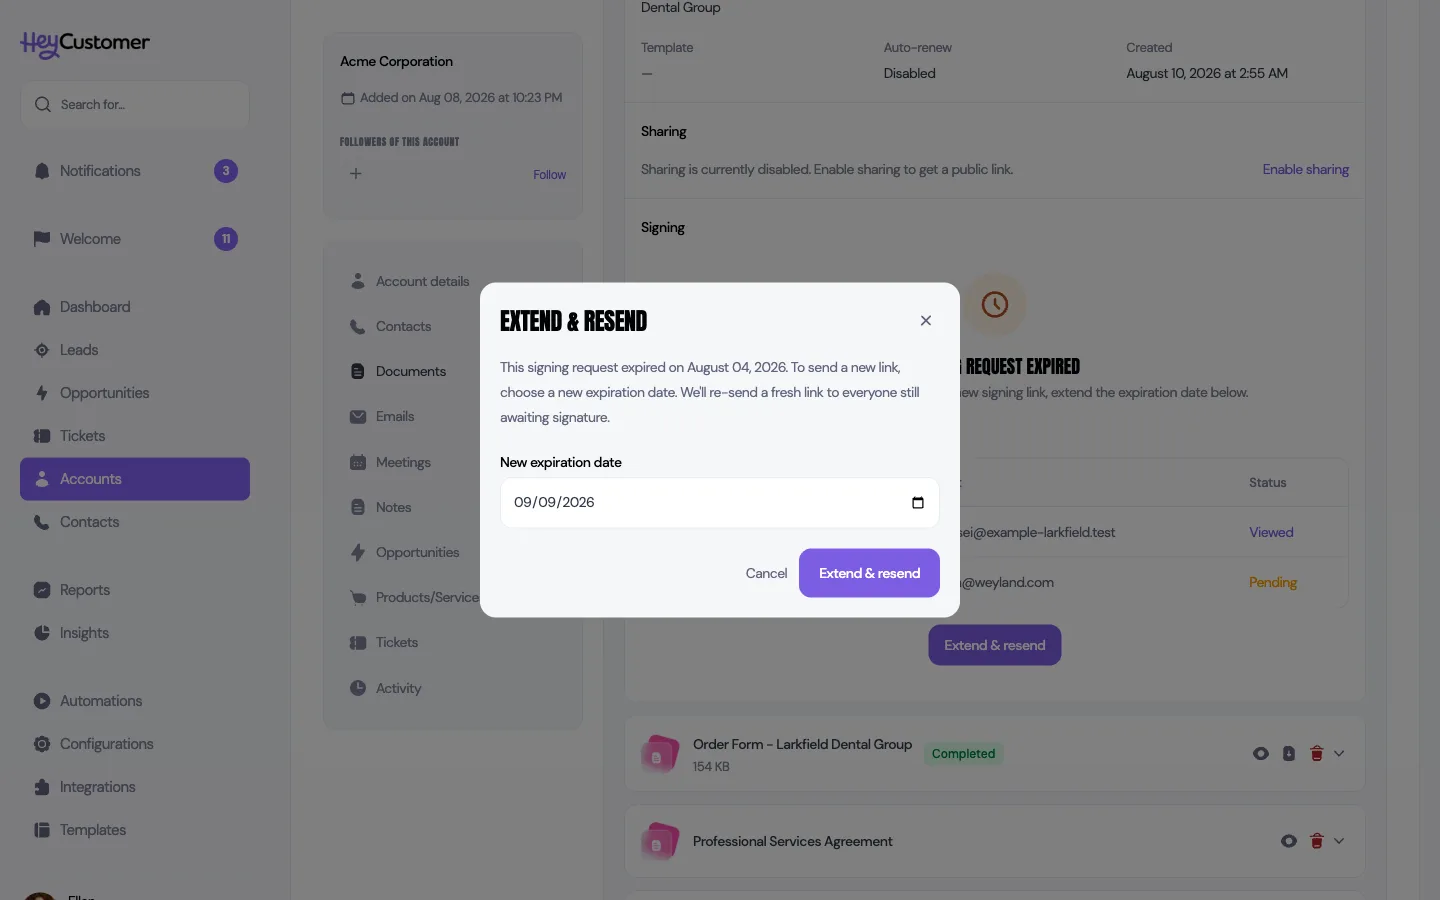
The Extend and resend dialog explaining that the request expired on a given date, with a New expiration date field and Cancel and Extend and resend buttons, over the expired signing panel behind it.

Anything already signed stays signed. Everyone still waiting gets a link that runs to the new date, and the people you'd already emailed are sent a fresh invitation. Someone further down the queue who hasn't been contacted yet isn't emailed early — they're invited when their turn comes, on the new deadline.

When everyone has signed

As the last signature lands, the panel switches to Document fully signed, with the completion date and each person's signing time. View signed document opens the finished PDF — signatures, typed entries and dates all in place — and the document's badge in the list turns to Completed.
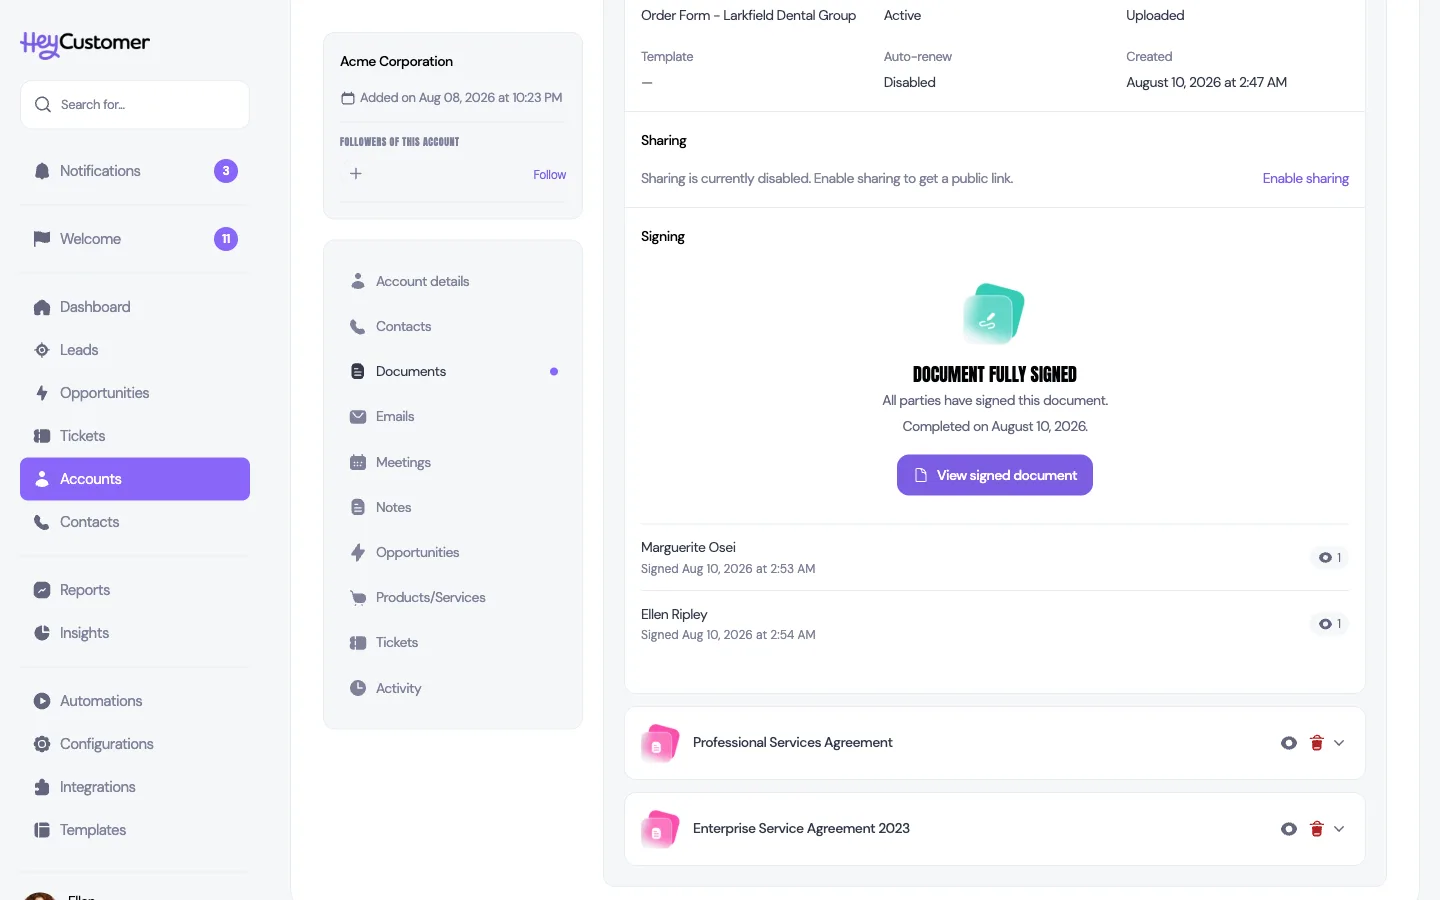
The signing panel reading Document fully signed, all parties have signed this document, with the completion date, a View signed document button, and both signers listed with the date and time each of them signed.

At the same moment, Hey Customer emails the finished PDF to whoever sent the request and to every person who signed it, so nobody has to ask for a copy.

A Certificate of Completion is added as the final page of that PDF. It records each signer's name, email address, role, the time they signed and the address they signed from, followed by a dated trail of everything that happened to the document — created, sent, opened, signed. That's the page to reach for if anyone ever questions the signature.

Good to know

  • Signing is for uploaded PDFs only, up to 10 MB each. Template-built documents can be shared by link but not signed.
  • A document has to belong to an account or an opportunity — there's nowhere to file one on its own.
  • There are two signer roles, Customer and Executive, so a document can go to two people. Everyone you add needs a signature field, and everyone who has a signature field needs to be added — a mismatch stops the request from sending, with a message telling you which role is missing.
  • Signing is always sequential. There's no option to ask everyone at once.
  • Reminders aren't sent automatically. Use Resend when you want to nudge someone.
  • The date on a Date field set to auto-insert is the date that person signs, which may not be the date you sent it.
  • Extend & resend only appears after the request has expired.
  • Signers are emailed a private link and never sign in, so make sure the address is right — anyone holding that link can sign as that person.
  • Working with an account's documents needs the Account Documents & Pricing permission. Documents on an opportunity aren't restricted this way.
  • The public sharing link and electronic signing are separate. Sharing publishes a read-only copy for anyone with the link; it doesn't collect signatures.

Still need help? Email us at support@heycustomer.com

Related articles

No items found.
e-signature, esignature, electronic signature, digital signature, sign a document, send for signature, signature request, signing request, signer, signers, add signers, signature field, text field, date field, signer fields, prepare for signature, upload pdf, pdf, contract, agreement, order form, proposal, countersign, void, cancel signing request, expired, extend and resend, resend invitation, decline to sign, certificate of completion, audit trail, signed copy, docusign alternative, sequential signing, signing order